

ORC Spring 2016: Week 3 - Progress & Paint
First, to those of you who offered kind words of support and encouragement after last week's post/Instagram, I so appreciate it. Despite some challenges, we have made real progress this week, and even if we are unable to fully finish the room, the biggest changes will have been made, and that is worth a lot! I have to keep reminding myself that this was supposed to be "Plan A" all along, so if parts of "Plan B" don't come to fruition, that's ok - they were never part of the budget or planning anyway. Surely I'm not the only one who gets carried away in this challenge? ;)
I need to give lots of recognition to my husband - with just a tiny bit of experience and a lot of gumption, he finished the frames for the built-ins in just a few days after work! I am so proud of him! They aren't quite complete, but I think by the end of the weekend we will be able to start priming.


While he has spent his time building, I have spent my hours painting. Both the walls and the trim are requiring a minimum of three coats each. I guess that's what happens when you are painting white over walls that have previously been green, dark blue, and even black. I have painted many, many walls in the past - as a military family, we moved multiple times & I painted each home we lived in. But this time, I have discovered something that has made a difference in the ease, quality, and time in which I get my painting done (which is sadly still very slow, but much faster than it used to be). Purdy was kind enough to share some brushes and rollers with me, and I am a true convert. I do not endorse a product if I don't believe in it, and I was so impressed by the quality of the Purdy brushes that I went out and purchased another brush on my own dime. And having an arsenal of brushes and rollers has come in very handy since it seems like that's all I do in my spare time now. :)
When I was designing the room, I was hesitant to do white walls. Almost every room in our home has white walls, but they are white woodwork - shiplap, beadboard, board & batten, etc. Something to give the white character. The dining room is one of the few spaces that is just drywall, and I worried that it would read as flat and lifeless. But I absolutely adore the warm white accented by the gray/blue/green trim, and find myself wandering in there to just check it out and enjoy the contrast. Next I just have to convince the hubby that the rest of the house needs to be repainted to match. ;) If anyone is wondering, the walls are Swiss Coffee and the trim is Fieldstone, both by Benjamin Moore.

And finally, my favorite piece of the room is the giant DIY abstract art that my sweet babies made for me. Other than choosing which colors of fingerpaint they could use, I let them have free reign. And while it may not be something that would sell in a gallery, it means SO much to me, especially the tiny handprints hidden in one corner. I propped it up on the piano in the adjoining foyer while we've been working in the dining room, and ironically, I like it so much there that I think it will probably stay instead of hanging in the dining room as was the original plan.


Lots of changes this week, and even more painting in our future. Ha! Then on to the fun part of decorating and accessorizing! Be sure to catch up with the other guest posters here. Have a great weekend!
I need to give lots of recognition to my husband - with just a tiny bit of experience and a lot of gumption, he finished the frames for the built-ins in just a few days after work! I am so proud of him! They aren't quite complete, but I think by the end of the weekend we will be able to start priming.
While he has spent his time building, I have spent my hours painting. Both the walls and the trim are requiring a minimum of three coats each. I guess that's what happens when you are painting white over walls that have previously been green, dark blue, and even black. I have painted many, many walls in the past - as a military family, we moved multiple times & I painted each home we lived in. But this time, I have discovered something that has made a difference in the ease, quality, and time in which I get my painting done (which is sadly still very slow, but much faster than it used to be). Purdy was kind enough to share some brushes and rollers with me, and I am a true convert. I do not endorse a product if I don't believe in it, and I was so impressed by the quality of the Purdy brushes that I went out and purchased another brush on my own dime. And having an arsenal of brushes and rollers has come in very handy since it seems like that's all I do in my spare time now. :)
When I was designing the room, I was hesitant to do white walls. Almost every room in our home has white walls, but they are white woodwork - shiplap, beadboard, board & batten, etc. Something to give the white character. The dining room is one of the few spaces that is just drywall, and I worried that it would read as flat and lifeless. But I absolutely adore the warm white accented by the gray/blue/green trim, and find myself wandering in there to just check it out and enjoy the contrast. Next I just have to convince the hubby that the rest of the house needs to be repainted to match. ;) If anyone is wondering, the walls are Swiss Coffee and the trim is Fieldstone, both by Benjamin Moore.
And finally, my favorite piece of the room is the giant DIY abstract art that my sweet babies made for me. Other than choosing which colors of fingerpaint they could use, I let them have free reign. And while it may not be something that would sell in a gallery, it means SO much to me, especially the tiny handprints hidden in one corner. I propped it up on the piano in the adjoining foyer while we've been working in the dining room, and ironically, I like it so much there that I think it will probably stay instead of hanging in the dining room as was the original plan.
Lots of changes this week, and even more painting in our future. Ha! Then on to the fun part of decorating and accessorizing! Be sure to catch up with the other guest posters here. Have a great weekend!
Thank you to Purdy for providing the products used to accomplish the painting
for this challenge
One Room Challenge Spring 2016: The Plan...Or What's Left of It
Earlier this week, I had an entirely different post ready to go. And then Murphy decided to pay our ORC a little visit. Isn't it a little early in the game for such antics? You might be thinking, well at least at this point you have time to scramble for a solution. But some of the issues will not be solved until well after the finale, if they are solved at all. And one of them is my fault. Our big vacation of the year, the already paid for, non-refundable, dates-absolutely-cannot-be changed-vacation, occurs during the ORC. So, instead of 5 weeks to complete our room (the ORC is 6 Thursday postings, but actually only 5 full weeks), we only have 4. That was a fun conversation to have with my husband. Oops.
If you follow me on Instagram, you saw that my husband decided to tackle built-ins (which made the timeline convo afterwards even more awkward). I'm so grateful that he loves to take on projects like this. He's never done a project this big before, but that was true of the built-in office and the "mudcloset" in the last ORC, so I am confident he will knock it out of the park. This time he even has an assistant; my 5 year old, who loves to help us with home projects, and wants to open a renovation company a la Fixer Upper. So my husband sweetly included her in the demo stage, and she was so excited. We kept the first piece of molding she removed, just in case she decided she wanted it as a souvenir for her future self. Let's just pretend they (mostly her daddy) didn't put a big hole in the sheetrock.
On to the design...
White walls, gray trim, and traditional lighting accented with an incredible piece of abstract art like this beauty by MECArt on Etsy (except my version will be a lot more personal, and a little more budget friendly). If you notice, there is something important missing: beautiful fabrics, my favorite part. :(
My window hardware and drapes were part of the Murphy mess, and probably the largest part of my budget, so I don't want to be hasty in choosing a replacement. We may have bare windows for a while, although my husband has offered his college solution of flags and towels, so at least we have a backup plan.
Check back in next week to see what progress we've made, and make sure to visit the other participants to see how they're faring! It's an exciting (?) ride to be sure!
Also sharing with Thoughts of Home, so please stop by and visit those sharing there as well!
One Room Challenge Spring 2016 - The Dining Room
Well, here we go again. We truly loved every gut-wrenching, sleep-deprived, nail-biting, exhilarating second of last fall's One Room Challenge, so I knew from the minute I hit publish on the final post in Nov. 2015 that we would be participating again. The biggest challenge (hehe) would be deciding which room we would tackle. And for a while, it seemed like the foyer was going to win out, mostly because it is small and my husband, aka electrician aka carpenter aka handyman aka jack-of-all-trades, was looking for something a little less hectic than the 3 spaces squeezed into 1 that we did last time. But as they say, the best laid plans...
Let me back up for a second, though. For those of you new to the One Room Challenge (or ORC), it is an intense, fun-filled, teeth-gnashing, tear-inducing challenge to makeover one room in your home (or someone else's!) in 6 short weeks. Linda from Calling It Home created this incredible program, and this year, House Beautiful magazine has joined her as a media partner. Every Wednesday, 20 sponsored bloggers/designers post their latest adventures, and every Thursday, guest bloggers (like myself) do the same. It is a great catalyst for finally getting those things crossed off your to-do list, and while you may be a little shell-shocked at the end, you will have formed new friendships, challenged yourself creatively (& possibly physically if you're a DIYer), and you will be so proud of what you have accomplished in such a short time frame! If you've ever considered joining in, I encourage you to give it a try! I will be here to cheer you along all the way.
So, back to my room. I've been pinning and designing my foyer ideas for months, since hubby said no to the dining room as it was too involved for his time commitment. And I completely respected that. But because my brain doesn't shut off, ever, I created a Plan A & a Plan B for our dining room, just for fun, although neither were to be a part of the ORC. Plan A was a short-term plan, on a budget, and would tide me over until I could budget for Plan B, and until we had the time to commit to Plan B. If you're curious, Plan B includes wallpaper, built-ins, custom window treatments, new table and chairs, and a few other miscellaneous items. Definitely not something for now.
If you follow me on Instagram (hcbinteriors), you know that a few weeks ago, I started on Plan A, because I had some white paint in my garage, and when you're on a budget, free is your best friend. When I started to look more at Plan A, I realized with a little creativity I could actually make some major changes, so here we are: a tweaked version of Plan A, and the hubby has signed on to help with the dining room. Hooray! I'll share my actual design plan next week, and how I plan to work with a smallish budget. I'm aware that budget means different things to different people; what may seem small to one person is huge to another, and vice-versa.
And now for the part everybody loves (please excuse the instagram photos, my computer is in the shop so I am using my iPad until next week):
BEFORE

And because I pulled out my free paint and got started before realizing this could actually work, I have 2 coats of white up, but need at least 2 more. So, we'll call this the BEFORE PRIMED :)

Let me back up for a second, though. For those of you new to the One Room Challenge (or ORC), it is an intense, fun-filled, teeth-gnashing, tear-inducing challenge to makeover one room in your home (or someone else's!) in 6 short weeks. Linda from Calling It Home created this incredible program, and this year, House Beautiful magazine has joined her as a media partner. Every Wednesday, 20 sponsored bloggers/designers post their latest adventures, and every Thursday, guest bloggers (like myself) do the same. It is a great catalyst for finally getting those things crossed off your to-do list, and while you may be a little shell-shocked at the end, you will have formed new friendships, challenged yourself creatively (& possibly physically if you're a DIYer), and you will be so proud of what you have accomplished in such a short time frame! If you've ever considered joining in, I encourage you to give it a try! I will be here to cheer you along all the way.
So, back to my room. I've been pinning and designing my foyer ideas for months, since hubby said no to the dining room as it was too involved for his time commitment. And I completely respected that. But because my brain doesn't shut off, ever, I created a Plan A & a Plan B for our dining room, just for fun, although neither were to be a part of the ORC. Plan A was a short-term plan, on a budget, and would tide me over until I could budget for Plan B, and until we had the time to commit to Plan B. If you're curious, Plan B includes wallpaper, built-ins, custom window treatments, new table and chairs, and a few other miscellaneous items. Definitely not something for now.
If you follow me on Instagram (hcbinteriors), you know that a few weeks ago, I started on Plan A, because I had some white paint in my garage, and when you're on a budget, free is your best friend. When I started to look more at Plan A, I realized with a little creativity I could actually make some major changes, so here we are: a tweaked version of Plan A, and the hubby has signed on to help with the dining room. Hooray! I'll share my actual design plan next week, and how I plan to work with a smallish budget. I'm aware that budget means different things to different people; what may seem small to one person is huge to another, and vice-versa.
And now for the part everybody loves (please excuse the instagram photos, my computer is in the shop so I am using my iPad until next week):
BEFORE
And because I pulled out my free paint and got started before realizing this could actually work, I have 2 coats of white up, but need at least 2 more. So, we'll call this the BEFORE PRIMED :)
Thanks for joining in on another ORC. It feels slightly similar to the experience of having a second child. With the first, there is so much excitement, and then total shock at how much harder and exhausting the whole thing is than you ever thought it would be. This time around, we are just as excited but also aware of what we are getting ourselves into, and we know there are sure to be surprises along the way. ;)
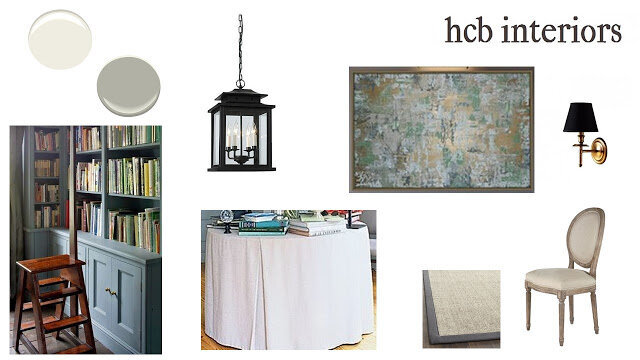
Modernizing Traditional Family Pieces
It is common in the South for families to pass pieces down for generations. I am blessed to have something in almost every room of my home that belonged to a family member at some point in time. However, the challenge comes when mixing those pieces with today's more modern, laidback lifestyle. Even the current traditional style is much more casual than our grandparents traditional tastes. It can be especially challenging when the piece you've inherited is completely opposite your own design choices, or is a treasured family heirloom that cannot be altered in any way (ie. paint) ;)
However, in my opinion, the best rooms are a balance of new and old. Older pieces have a patina and character that cannot be replicated, and often have a quality not found in today's furnishings. They add a sense of warmth to a room. The new keeps those older pieces from looking shabby, outdated, or dowdy. The design board below shows an example of this mix:

However, in my opinion, the best rooms are a balance of new and old. Older pieces have a patina and character that cannot be replicated, and often have a quality not found in today's furnishings. They add a sense of warmth to a room. The new keeps those older pieces from looking shabby, outdated, or dowdy. The design board below shows an example of this mix:
Two commonly inherited items are rugs and buffets. To balance out the traditional heaviness of these two pieces, I added in fun lighting (love that Sputnik style chandelier!), abstract art, and upholstered seating. I pulled the blues and golds from the rug, and used them in the art and lighting so that even though the pieces are very different stylistically, they still share a commonality.
To further ensure the space would read as modernized traditional, I used Farrow + Ball's Wevet (white) on the walls, and Worsted (gray) on the trim. By using color on the trim, instead of traditional white, the design continues to contrast the seriousness the older pieces bring to the space.
Hope this helps some of you who may be struggling with mixing those family pieces in with your own style. On a sidenote, Farrow + Ball released nine new colours this year, and they, along with Paige Minear at The Pink Clutch, are generously giving away a gallon to the reader who creates their favorite mood board. Head over to Paige's blog to find out how to enter. Good luck!
35 in 35
Happy New Year! I hope you had a blessed holiday season. I made an effort to simplify the Christmas season at our house (is that ironic or an oxymoron? Effort to simplify. Lol). But, it truly made a difference in my stress levels. We didn't get out every single last decoration, we didn't make ourselves sick trying to complete our Christmas bucket list, and we didn't race from event to event like in years past. It was so nice to spend quality time at home with my little family. I hope you were able to enjoy it as well.
I am a (almost) New Year's baby. And this year I turned 35. Not a huge birthday, but it definitely feels like a marker of sorts. 35 is firmly entrenched in adulthood, like it or not. And while I've never been one to dwell on age or numbers, I am well aware that my mom was only 9 years older than me when she received her first cancer diagnosis, and 23 years older than my current age when she passed away. She accomplished almost all of her life goals before her too-early passing, and I have felt an urgency over the past year to use her inspiration as a drive to be intentional in accomplishing my own life goals.
These thoughts, along with seeing Amanda's list, led to the creation of my own list. I have written down goals multiple times recently, only to lose my list (getting back to my natural inclination towards organization is one of my goals). Posting my list here not only keeps me accountable, but also ensures I won't lose my list. I would love to hear any goals or dreams you have for the coming year. Let's make 2016 a great one!

Holly's 35 in 35 (not in any particular order)
I am a (almost) New Year's baby. And this year I turned 35. Not a huge birthday, but it definitely feels like a marker of sorts. 35 is firmly entrenched in adulthood, like it or not. And while I've never been one to dwell on age or numbers, I am well aware that my mom was only 9 years older than me when she received her first cancer diagnosis, and 23 years older than my current age when she passed away. She accomplished almost all of her life goals before her too-early passing, and I have felt an urgency over the past year to use her inspiration as a drive to be intentional in accomplishing my own life goals.
These thoughts, along with seeing Amanda's list, led to the creation of my own list. I have written down goals multiple times recently, only to lose my list (getting back to my natural inclination towards organization is one of my goals). Posting my list here not only keeps me accountable, but also ensures I won't lose my list. I would love to hear any goals or dreams you have for the coming year. Let's make 2016 a great one!
Holly's 35 in 35 (not in any particular order)
- Go to bed at 10pm, lights out no later than 11 (so long, Netflix binges)
- Read more books
- Watch less tv
- Make a budget & stick to it
- Participate in at least one of the 2016 One Room Challenge
- Plan a trip to Seaside; the last vacation spot we took as a family before my mom passed away. It will have been 5 years in June since our last trip
- Blog more frequently
- Improve my photography skills (learn through books/classes/articles)
- Focus on my time-management skills
- Organize my home; this is something that used to come easily to me, but I struggle now that I have 2 little ones (& a spouse who is the complete opposite of organized)
- Use my Day Planner every day (see #8)
- Learn how to sew
- Attempt more DIY on my own (instead of having hubby do it for me)
- Bake more with my girls
- Improve my health through regular exercise (starting with a minimum of 3 days a week) & decrease sugar in my diet
- Train for and run a 5K
- Create annual photo albums
- Meal-plan every week & cook more at home
- Go out on more dates with my hubby
- Learn to play the guitar
- Play the piano more frequently
- Purge our home so that only things with meaning remain
- Dust off my French language skills
- Learn more world & American history
- Volunteer on a more regular basis
- Work on paintings or crafting
- Start a cleaning schedule & stick to it
- Plan more weekend adventures instead of sitting around the house
- Focus on creating memories & traditions for my girls
- Practice Random Acts of Kindness
- Take my oldest to tea at the Ritz
- Implement the landscape plan for our house that I designed 2 years ago
- Create an outdoor living space (I dream of a screened porch) we can use & enjoy year-round
- Send snail mail on a regular basis (& become better about the timeliness of thank you notes)
- Celebrate each day for the gift that it is!
My Inspiration Word for 2016
Happy New Year y'all! I hope everyone had a blessed and happy holiday season full of love and laughter. The holidays are bittersweet for me; fall through Christmas is my favorite time of year, and the time of year most filled with our family traditions, which are so important to me. But, it's also difficult because my mom shared my love of the holidays and traditions, and she passed away exactly 3 weeks before Christmas. Focusing on sharing the joy of Christmas & the other holidays with my girls helps me to push through my sadness, and also is a great way for me to share a part of my mom with them. I both look forward to and dread the holiday season every year, but this year the scales seemed to tip just a bit more towards joy, and for that I am grateful.
Like most people, I have spent the past couple of days reflecting on 2015, & thinking about what I want out of 2016. I've never chosen a word of the year before, but I as I was thinking about my goals, one word kept leaping out at me: FOCUS. I want to focus more on the people around me, and less on the distractions of everyday life. I want to focus on my time management so that I can spend more time making memories, and less time on my to-do list. I want to focus on my ideas & goals in order to complete the things I start, and not leave half-completed projects and partially fulfilled dreams in my wake.
I have another post for tomorrow detailing more of my plans for 2016. Until then, I'd love to hear if you have a word for the new year!
One Room Challenge Laundry/Mudroom/Office: Sources
First, thank y'all SO much for all the love, comments, Instagram likes, etc. regarding our One Room Challenge. We poured a lot of love, sweat, and even a few tears into this project, and we love it. It makes it even more fun to know that y'all like it too. We truly appreciate the support!
I wanted to do a quick rundown of the sources for most everything we used. The main credit goes to my awesome hubby who not only did almost all of the physical labor, but even enjoyed it! Maybe he will become the next Chip Gaines; he's sure goofy enough to fit the part. ;)
Please excuse some repeat photos. I just don't have the energy to take new ones and edit. :)


Walls: Benjamin Moore White Dove
Beadboard and stencil: Sherwin Williams Urbane Bronze
Stencil: Sari Paisley Allover Stencil from Cutting Edge Stencils
Boxwood wreath: Smith and Hawken at Target
Beadboard: Sherwin Williams Urbane Bronze
Hooks: oil rubbed bronze, Home Depot
Artwork: local antique store


Chalkboard Wall: Sherwin Williams Urbane Bronze, coated with Martha Stewart Crafts Multi- Surface Chalkboard Acrylic in Clear
Trim: Benjamin Moore White Dove
Beadboard: Sherwin Williams Urbane Bronze
Brass Sconce: Ethan wall sconce, World Market
Table Lamp: Pottery Barn (purchased many years ago)
Floating Desk with roll-out keyboard: Built by us (really, my hubby), finished in
Benjamin Moore Chelsea Gray
Cubby: Target
Metal Trash Can under desk: Ballard Designs
Chair: Ballard Designs
Chair Pad: Ballard Designs
Striped Day Planner: Whitney English's Day Designer at Target
Jesus and Coffee Mug: Creations by Courtney
I wanted to do a quick rundown of the sources for most everything we used. The main credit goes to my awesome hubby who not only did almost all of the physical labor, but even enjoyed it! Maybe he will become the next Chip Gaines; he's sure goofy enough to fit the part. ;)
Please excuse some repeat photos. I just don't have the energy to take new ones and edit. :)


Accordion Drying Rack: Better Homes & Gardens, purchased via Amazon
Metal B: Hobby Lobby
Focus on the Good Canvas: TJ Maxx
Wall Mount Sink: Mustee Laundry Tub, purchased via Amazon
Faucet: Ikea (purchased many years ago)
Boxwood: Smith & Hawken at Target
Cabinet Pulls: oil rubbed bronze from Home Depot
Rug: HomeGoods
Apron: Anthropologie
Light: Hampton Bay oil rubbed bronze vintage flushmount Home Depot (excuse the grainy iPhone photo)
Walls: Benjamin Moore White Dove
Beadboard and stencil: Sherwin Williams Urbane Bronze
Stencil: Sari Paisley Allover Stencil from Cutting Edge Stencils
Boxwood wreath: Smith and Hawken at Target
Beadboard: Sherwin Williams Urbane Bronze
Hooks: oil rubbed bronze, Home Depot
Artwork: local antique store
Bulletin Board: HomeGoods (purchased many years ago)
Rug: HomeGoods
State of Georgia Chalkboard: local gift store
Brass Pendant Light: HomeGoods
Chalkboard Wall: Sherwin Williams Urbane Bronze, coated with Martha Stewart Crafts Multi- Surface Chalkboard Acrylic in Clear
Trim: Benjamin Moore White Dove
Beadboard: Sherwin Williams Urbane Bronze
Brass Sconce: Ethan wall sconce, World Market
Table Lamp: Pottery Barn (purchased many years ago)
Floating Desk with roll-out keyboard: Built by us (really, my hubby), finished in
Benjamin Moore Chelsea Gray
Cubby: Target
Metal Trash Can under desk: Ballard Designs
Chair: Ballard Designs
Chair Pad: Ballard Designs
Striped Day Planner: Whitney English's Day Designer at Target
Jesus and Coffee Mug: Creations by Courtney
ORC Week 6: We Made It! (Literally & Figuratively)
Well, we made it to the end of our first One Room Challenge, and I am SO glad we did it. It was exhausting: 2 am has become our new normal bedtime. And it was a tad stressful at times. But, we worked hard as a team, and I am so proud of my husband and the skills he honed along the way. I'm also proud of us for setting a goal and sticking to it. We tend to meander our way through projects around here (I'm looking at you, uncaulked & unpainted crown molding installed 6 months ago in our daughter's room). It's amazing how much you can accomplish when you don't binge watch a show on Netflix.
For those dropping in for the first time, we committed to making over our laundry room, mudcloset, & garage entry, and we turned a pantry into an office nook in the kitchen hallway. You can see our intro here, design plan here, and play catch up here, here, and here. Linda of Calling It Home created this wonderful blog program, a 6 week exercise in design (& a little insanity). It was so fun, and we've already come up with ideas for at least 3 other rooms. I'm not sure we will participate in 3 more ORCs consecutively as budget does play a huge factor in timeliness. But, I am sure we will do this again, and hopefully soon. Ok, enough talking. On with the pictures.
As a reminder, here is a before shot of the laundry room.

It wasn't bad; in fact, most people who visit our home comment on how much they loved the laundry room walls. But, it just wasn't for me. I spend a lot of my day in the kitchen, which has a direct view of the laundry room, and I needed it to be a place that felt "me". So now it looks like this:

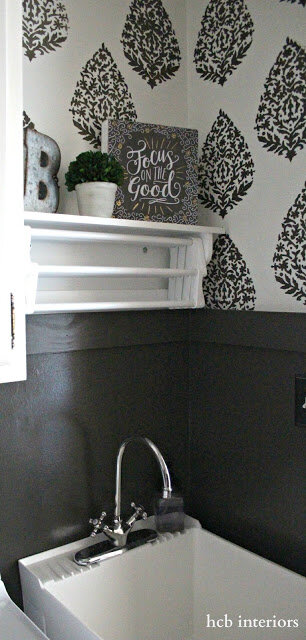
We painted the walls, stenciled, and installed beadboard. We also installed new hooks, cabinet pulls, an accordion-style drying rack, and a wall-mount utility tub. This last one was important because the legs of the old sink pushed the dog's bowls out into the doorway - now we can actually close the door. Hooray! We scrapped the idea of shelving over the drying rack & washer/dryer. I may go back and add that in later, but I wanted to get a feel for the use of the space before adding more clutter into this small room.

This space is so tight that we had to forgo the beadboard on the back wall. That tiny difference in depth was enough to cause the new sink to stick out into the doorway. So, we painted the drywall to match the beadboard, and kept the top trim piece to provide continuity. I'm pretty excited that this new drying rack won't smack me in the head each time I use the sink, unlike the previous rack that was way too big for the space.

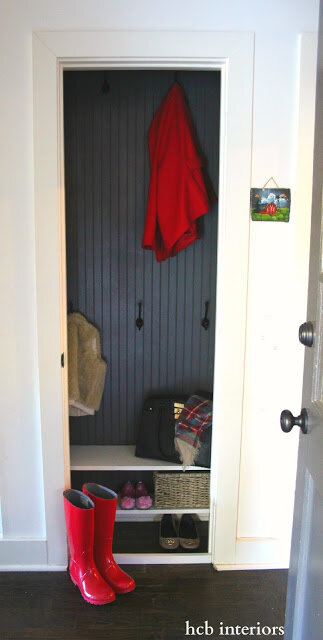
Up next is our "mudcloset". This space is only 36" wide by 10" deep. So not even a full foot of storage space depth. Argh. But, it is better than the option of walking across the house every time you need shoes or a jacket. I had planned on stenciling the walls of the mudcloset to match those in the laundry room. But hours of hard work ending in imperfections and frustration convinced me that easy-to-install beadboard might be a better choice, and it is definitely more durable against wet jackets and muddy shoes. We also removed the inefficient top shelf, added more shelving/shoe storage at the bottom, and raised all the hooks so that our jackets weren't completely covering those of our girls.
Now on to the office nook. This was a random idea I threw in at the last minute, after we had already decided to tackle the other areas. Luckily, hubby was game to try his hand at building a floating desk, and I am SO proud and impressed by his talent. Time and space constraints prevented us from building the cubby system I had originally designed, but I think this one is a suitable replacement. I love the character the World Market sconce adds to the space, but the best part is my babies watching over me from the chalkboard wall. I adore looking at those precious faces while I'm working.

And finally, a before and after of the whole space.
 After painting the slivers of wall next to the garage door white, we decided it was a little boring. A last minute decision (as in this past weekend) was made to continue the beadboard and trim out here, and I'm so glad we did. I think it really is the key to providing continuity between all the spaces.
Thanks for joining us on this journey. It was definitely worth it, and we will absolutely do it again (although I am so thankful that the next one is not any time soon. This mama needs some sleep!). Having time/budget/space limits required us to get a little creative in certain areas, and it also forced me to accept imperfections and constraints that would have frustrated me otherwise. Most importantly, my husband and I enjoyed working as a team, and this project cemented our love for DIY (although I'm a bigger fan of the idea part of DIY. I'm lucky the other half of my team likes the actual DIY). ;)
A big thanks to Linda for creating and hosting the One Room Challenge. My next post (hopefully early next week) will include sources for all the spaces. Until then, go check out the other 175+ guest participants! :)
For those dropping in for the first time, we committed to making over our laundry room, mudcloset, & garage entry, and we turned a pantry into an office nook in the kitchen hallway. You can see our intro here, design plan here, and play catch up here, here, and here. Linda of Calling It Home created this wonderful blog program, a 6 week exercise in design (& a little insanity). It was so fun, and we've already come up with ideas for at least 3 other rooms. I'm not sure we will participate in 3 more ORCs consecutively as budget does play a huge factor in timeliness. But, I am sure we will do this again, and hopefully soon. Ok, enough talking. On with the pictures.
As a reminder, here is a before shot of the laundry room.
It wasn't bad; in fact, most people who visit our home comment on how much they loved the laundry room walls. But, it just wasn't for me. I spend a lot of my day in the kitchen, which has a direct view of the laundry room, and I needed it to be a place that felt "me". So now it looks like this:
We painted the walls, stenciled, and installed beadboard. We also installed new hooks, cabinet pulls, an accordion-style drying rack, and a wall-mount utility tub. This last one was important because the legs of the old sink pushed the dog's bowls out into the doorway - now we can actually close the door. Hooray! We scrapped the idea of shelving over the drying rack & washer/dryer. I may go back and add that in later, but I wanted to get a feel for the use of the space before adding more clutter into this small room.
This space is so tight that we had to forgo the beadboard on the back wall. That tiny difference in depth was enough to cause the new sink to stick out into the doorway. So, we painted the drywall to match the beadboard, and kept the top trim piece to provide continuity. I'm pretty excited that this new drying rack won't smack me in the head each time I use the sink, unlike the previous rack that was way too big for the space.
Up next is our "mudcloset". This space is only 36" wide by 10" deep. So not even a full foot of storage space depth. Argh. But, it is better than the option of walking across the house every time you need shoes or a jacket. I had planned on stenciling the walls of the mudcloset to match those in the laundry room. But hours of hard work ending in imperfections and frustration convinced me that easy-to-install beadboard might be a better choice, and it is definitely more durable against wet jackets and muddy shoes. We also removed the inefficient top shelf, added more shelving/shoe storage at the bottom, and raised all the hooks so that our jackets weren't completely covering those of our girls.
 |
| The almost imperceptible marks on the sliver of wall to the right are my babies' growth charts. We will never be able to paint this section ;) |
Now on to the office nook. This was a random idea I threw in at the last minute, after we had already decided to tackle the other areas. Luckily, hubby was game to try his hand at building a floating desk, and I am SO proud and impressed by his talent. Time and space constraints prevented us from building the cubby system I had originally designed, but I think this one is a suitable replacement. I love the character the World Market sconce adds to the space, but the best part is my babies watching over me from the chalkboard wall. I adore looking at those precious faces while I'm working.
And finally, a before and after of the whole space.
Thanks for joining us on this journey. It was definitely worth it, and we will absolutely do it again (although I am so thankful that the next one is not any time soon. This mama needs some sleep!). Having time/budget/space limits required us to get a little creative in certain areas, and it also forced me to accept imperfections and constraints that would have frustrated me otherwise. Most importantly, my husband and I enjoyed working as a team, and this project cemented our love for DIY (although I'm a bigger fan of the idea part of DIY. I'm lucky the other half of my team likes the actual DIY). ;)
A big thanks to Linda for creating and hosting the One Room Challenge. My next post (hopefully early next week) will include sources for all the spaces. Until then, go check out the other 175+ guest participants! :)
ORC Week 5: Denial is One of the Stages
First off, please excuse the look of my blog - I am in the middle of updating it but it's not quite finished. Second, how is this the last full week of the ORC?!? For those of you just joining in, the One Room Challenge (ORC) is a blog program in which almost 200 bloggers, designers, etc. commit to changing up a room in 6 short weeks. I have learned that pacing yourself is EXTREMELY important - at the beginning, it seemed like we had so much time, and now that we are down to the wire, I would say we are still just barely over half done with our projects. Eeek!!!
My sweet, supportive husband (aka contractor/handyman/electrician/plumber) has been working his tail off this week. In the past few days, he has installed the beadboard & trim in the laundry room, framed out the desk area, put in a new sink, and installed more lighting. I know I am going to owe him big time after this. And don't even think about telling him that I've already got plans for the Spring 2016 ORC up my sleeve ;)

Speaking of lighting, that has been our challenge this week. I think I've mentioned before that the lighting in our oldish home is quirky at best & downright dangerous in some areas. Luckily, I have a a great team of electricians on speed dial, & they have benefited from dozens of hours and thousands of dollars as we bring our home up to code. Our biggest snafu this week was when the junction box in the laundry room shattered into a dozen pieces while my husband was putting in the last screw of our new light. And while hubby is a super handy guy, installing a new junction box was something he didn't feel comfortable doing. So we had a last minute visit from the electrician today, and after he took a look at it, we were very glad we called in the professionals. It might have set us back in both time & money, but at least now we don't have to worry that old wiring will cause a fire.
I really liked the old schoolhouse light we had in here (see above photo for reference), but when I realized the laundry room light was directly behind the new glass & brass light we hung in the hallway, I knew we needed a more similar light for a cohesive look. HomeGoods did not have a second of my hallway light, so I found this one from Home Depot. It's actually huge (I thought it was a small pendant at purchase), but I think it works. Unfortunately, all that electrical work left a huge hole in the ceiling, and there's no time to fix it, so instead we slapped a coat of Urbane Bronze on an old ceiling medallion & it covered the hole perfectly. It wouldn't have been my first choice as the light fixture is simple, & the medallion is a bit much size-wise, but when you're in a time crunch, sometimes you just have to go with it.
I also scrambled to find new lighting for the office nook after realizing the picture light I had purchased previously was too formal for the space. Luckily, we snagged the last 2 of the sconces I found at my local World Market, & I also ordered these beauties from Lowe's. I think I will be going with the World Market sconces, but may have to find a different place in my home for the Allen & Roth sconces - they're just too great to give up! ;)

We still have yet to start on the mudcloset, and the desk & entry are only about 10% complete.. Yikes. It's time to up the coffee intake.
Let's look at our to-do list, shall we? Or maybe we shouldn't. Sometimes denial is a beautiful coping mechanism.
Install beadboard & molding // Paint & stencil walls (Praise the Lord I can cross this off) // Install hooks on molding // New utility sink // Pulls for cabinets // New lighting ? // Replace drying rack // Install shelf above washer & dryer // Install shelves above drying rack
Paint walls // New rug // New lighting // Install beadboard (added to the list this week)
Chalkboard or pinboard // Lighting (purchased but not yet hung)
My sweet, supportive husband (aka contractor/handyman/electrician/plumber) has been working his tail off this week. In the past few days, he has installed the beadboard & trim in the laundry room, framed out the desk area, put in a new sink, and installed more lighting. I know I am going to owe him big time after this. And don't even think about telling him that I've already got plans for the Spring 2016 ORC up my sleeve ;)
 |
| Finding a wall-mount utility tub with the faucet on the sink instead of mounted to the wall was a challenge. See all the open floor space? Now the dog's bowls can go under the sink instead of in the doorway. Hooray for small victories! :) |
I really liked the old schoolhouse light we had in here (see above photo for reference), but when I realized the laundry room light was directly behind the new glass & brass light we hung in the hallway, I knew we needed a more similar light for a cohesive look. HomeGoods did not have a second of my hallway light, so I found this one from Home Depot. It's actually huge (I thought it was a small pendant at purchase), but I think it works. Unfortunately, all that electrical work left a huge hole in the ceiling, and there's no time to fix it, so instead we slapped a coat of Urbane Bronze on an old ceiling medallion & it covered the hole perfectly. It wouldn't have been my first choice as the light fixture is simple, & the medallion is a bit much size-wise, but when you're in a time crunch, sometimes you just have to go with it.
 |
| Excuse the poor quality. This room is so hard to get a photo of, as there are no windows nearby. |
We still have yet to start on the mudcloset, and the desk & entry are only about 10% complete.. Yikes. It's time to up the coffee intake.
Let's look at our to-do list, shall we? Or maybe we shouldn't. Sometimes denial is a beautiful coping mechanism.
Laundry:
Entry:
Mudcloset:
Repaint // Lower top hooks so shelf is more accessible // Add shoe storage // Add more hooks
Office nook:
Floating desk // Install outlet // New printer // Cubby holes/storage for mail, office supplies
ORC Week 4: Never Stenciling Again
Y'all....
From now on, if I ever mention stenciling, just remind me to start saving pennies for the wallpapers of my dreams. Schumacher, Phillip Jeffries, Quadrille - I should not have abandoned you. ;)
In all seriousness, stenciling is not for the faint of heart, and definitely not for Type A personalities. I'm more of an A-/B+ type myself, but the misalignments and random paint smears just about sent me over the edge. As there was no wine in the house to ease my pain, I helped myself to the Halloween candy stash. We might need to re-stock. Oops.
Part of the issue with the stencil is my fault. The design I chose came with a dot in between each damask. But I did not want the dot as I was going for more of a block print look, so I taped over the dots to ensure that they would not get stenciled on the walls. I realized after my 3rd unevenly spaced attempt that the dots also help to line up the stencil. Once I figured that out, I just eyeballed where the dots should be & measured (again by eyeballing it) from there. The lack of actual measuring is the Type B+ personality I mentioned earlier. ;)
Stenciling the corners is where the real mashing of teeth began. I may have to redo that section to cover up the awful smearing & paint globs. It was not quite as easy as the pros make it look. And I learned that it was best if I waited about 5 minutes in between each stencil to allow for some drying, even though the instructions say you can move on immediately. But we persevered, and I am very happy with the overall result. It is beginning to look like what I pictured in my head (minus all the mistakes), & it's really fun.
In other parts of the reno, the hubs decided that he would not have time to custom build cubbies over the desk. I totally understand, but man, it would have looked so good. Luckily, the day after he told me it was a no-go, I happened upon multiple options while at Target, and after squishing my children to the side, managed to load 4 of them in my buggy. This beauty is the winner in both form & function.
It changes the influence of my design a tad - it's a little more rustic/industrial than my original idea, but luckily I have some other galvanized pieces I can pull from around the house to make it work. It does mean that we have to return the lighting I purchased for the space; the picture light is formal & traditional, and the desk area is now leaning towards industrial farmhouse, so it's back to the search I go. In a moment of insanity while feeling sorry for me, hubby offered to create some custom lighting if I can't find anything in my increasingly dwindling budget, so that's my fallback plan. Sounds foolproof, right?
Finally, I finished the chalkboard wall in the office nook with Martha Stewart Crafts Multi-Surface Chalkboard Acrylic Craft Finish in Chalkboard Clear. I used the entire bottle to apply 4 coats, with a few hours of dry time in between each coat. I waited a full 24 hours after the last coat, and then seasoned the entire wall with a couple pieces of chalk. It seems to be working great, but I will let you know if that changes over time. At 1 am last night, my sweet husband decided to start framing out the desk to try to get ahead of the lack of work we are predicting will happen over Halloween weekend. Trick or Treating comes first. #priorities
Oh, and the mudcloset hasn't even been touched yet. Yikes.
In case lists are your thing (they rank high on my...list... of favorite things. See what I did there?), let's check in on our progress.
Paint walls // New rug // New lighting
Chalkboard or pinboard // Lighting
From now on, if I ever mention stenciling, just remind me to start saving pennies for the wallpapers of my dreams. Schumacher, Phillip Jeffries, Quadrille - I should not have abandoned you. ;)
In all seriousness, stenciling is not for the faint of heart, and definitely not for Type A personalities. I'm more of an A-/B+ type myself, but the misalignments and random paint smears just about sent me over the edge. As there was no wine in the house to ease my pain, I helped myself to the Halloween candy stash. We might need to re-stock. Oops.
Part of the issue with the stencil is my fault. The design I chose came with a dot in between each damask. But I did not want the dot as I was going for more of a block print look, so I taped over the dots to ensure that they would not get stenciled on the walls. I realized after my 3rd unevenly spaced attempt that the dots also help to line up the stencil. Once I figured that out, I just eyeballed where the dots should be & measured (again by eyeballing it) from there. The lack of actual measuring is the Type B+ personality I mentioned earlier. ;)
Stenciling the corners is where the real mashing of teeth began. I may have to redo that section to cover up the awful smearing & paint globs. It was not quite as easy as the pros make it look. And I learned that it was best if I waited about 5 minutes in between each stencil to allow for some drying, even though the instructions say you can move on immediately. But we persevered, and I am very happy with the overall result. It is beginning to look like what I pictured in my head (minus all the mistakes), & it's really fun.
 |
| Only 1 damask stencil left to go. And a glimpse of the new pulls that I LOVE. Ignore the unpainted bottom right corner; that will be covered with beadboard :) |
In other parts of the reno, the hubs decided that he would not have time to custom build cubbies over the desk. I totally understand, but man, it would have looked so good. Luckily, the day after he told me it was a no-go, I happened upon multiple options while at Target, and after squishing my children to the side, managed to load 4 of them in my buggy. This beauty is the winner in both form & function.
 |
| Notice anything funky about #8? It makes me laugh each time I see it upside down. All the ones in the store were the same. Might have to keep it for the quirkiness. |
It changes the influence of my design a tad - it's a little more rustic/industrial than my original idea, but luckily I have some other galvanized pieces I can pull from around the house to make it work. It does mean that we have to return the lighting I purchased for the space; the picture light is formal & traditional, and the desk area is now leaning towards industrial farmhouse, so it's back to the search I go. In a moment of insanity while feeling sorry for me, hubby offered to create some custom lighting if I can't find anything in my increasingly dwindling budget, so that's my fallback plan. Sounds foolproof, right?
 |
| Despite the lighting issue in the office nook, I am in LOVE with my fun find at HomeGoods of all places! Still needs a cool lightbulb after hubby broke the other one. And in the background is a glimpse of the partially painted entry wall (was Stratton Blue, now is White Dove. Or at least most of it is) |
 |
| Please excuse the lighting in all of these. It's been raining for days in GA, & my camera has a temper tantrum each time I try to take shots without a flash. You can see the chalkiness of the chalkboard paint on the upper part of the wall. |
Oh, and the mudcloset hasn't even been touched yet. Yikes.
In case lists are your thing (they rank high on my...list... of favorite things. See what I did there?), let's check in on our progress.
Laundry:
Install beadboard & molding // Paint & stencil walls (Praise the Lord I can cross this off) // Install hooks on molding // New utility sink // Pulls for cabinets // New lighting ? // Replace drying rack // Install shelf above washer & dryer // Install shelves above drying rack
Entry:
Mudcloset:
Repaint // Lower top hooks so shelf is more accessible // Add shoe storage // Add more hooks
Office nook:
Floating desk // Install outlet // New printer // Cubby holes/storage for mail, office supplies
If you just now catching up, you can see Week 1, Week 2, & Week 3 here. And don't forget to visit Linda at Calling It Home to check in on the almost 200 other participants.
Happy Halloween y'all!
ORC Week 3: Progress??
Well, we're halfway through, and I cannot confidently say that we're halfway done with our work. Ahh!! We've had a few setbacks, most notably time. The baby had croup, and the hubby was out of town all weekend, so we are trying to make up for it by working late after the kiddos are in bed. Coffee & I have always been BFFs, but now we are thisclose.
That being said, it's still pathetic how much we've gotten done compared to our normal project timelines. Guess those Netflix marathons really do cut into productivity.
We painted the office nook Sherwin Williams Urbane Bronze, & I love love love the dark against all the white in our home. I've used this color before, mainly on our exterior doors, but I've never used it on walls. Looks so good. After a couple coats of the UB, I started coating a portion of the back wall with Martha's Multi-Surface Chalkboard Acrylic Craft Finish. It has given the wall a slightly chalky/glazed sheen, but still looks fine. I think the fact that the wall has so many imperfections and is in a dimly lit space helps; not sure how it would look in a sunlit area.
I started on the stencil work in the laundry room, and I am in love with the design. I've never stenciled before, so the results have been imperfect, but I actually kind of like it better that way. Hopefully, I'll finish it tomorrow so that we can start installing beadboard this weekend.
Luckily, our only snafus so far have been minor. I scored a great deal at HomeGoods, & found a light that is a little out of my comfort zone (which is laughable because it's so tame, but my style is farmhouse/cottage/classic & this light is a teensy bit industrial). I think it will really make the space though, and add a little zing. However, when I was removing all the stickers the manufacturer plastered it with, some of the finish came off. And then the awesome vintage lightbulb I paid extra for popped in half when my husband (who would like acknowledgement for his obvious brute strength) pulled it out of the box. But if those are our only issues, I will gladly take them!

There is still so much left to do, most notably installing paneling, building a free floating desk, and installing a new sink. Check back next week to see how much more we've done, or if we've gone off the deep end. Right now, it's a toss-up. ;)
Follow me on Instagram at hcbinteriors for more frequent updates. And don't forget to check out the other participants - the talent is incredible!
That being said, it's still pathetic how much we've gotten done compared to our normal project timelines. Guess those Netflix marathons really do cut into productivity.
We painted the office nook Sherwin Williams Urbane Bronze, & I love love love the dark against all the white in our home. I've used this color before, mainly on our exterior doors, but I've never used it on walls. Looks so good. After a couple coats of the UB, I started coating a portion of the back wall with Martha's Multi-Surface Chalkboard Acrylic Craft Finish. It has given the wall a slightly chalky/glazed sheen, but still looks fine. I think the fact that the wall has so many imperfections and is in a dimly lit space helps; not sure how it would look in a sunlit area.
I started on the stencil work in the laundry room, and I am in love with the design. I've never stenciled before, so the results have been imperfect, but I actually kind of like it better that way. Hopefully, I'll finish it tomorrow so that we can start installing beadboard this weekend.
 |
| A little hint at the stencil work |
Luckily, our only snafus so far have been minor. I scored a great deal at HomeGoods, & found a light that is a little out of my comfort zone (which is laughable because it's so tame, but my style is farmhouse/cottage/classic & this light is a teensy bit industrial). I think it will really make the space though, and add a little zing. However, when I was removing all the stickers the manufacturer plastered it with, some of the finish came off. And then the awesome vintage lightbulb I paid extra for popped in half when my husband (who would like acknowledgement for his obvious brute strength) pulled it out of the box. But if those are our only issues, I will gladly take them!
There is still so much left to do, most notably installing paneling, building a free floating desk, and installing a new sink. Check back next week to see how much more we've done, or if we've gone off the deep end. Right now, it's a toss-up. ;)
Follow me on Instagram at hcbinteriors for more frequent updates. And don't forget to check out the other participants - the talent is incredible!
ORC Week 2: Demo & Design Plan
Not surprisingly, the laundry room & to-be office nook look huge now that they're empty of junk. But they're actually fairly small: the laundry room is 35 sq. ft. & the office nook is only 4 ft wide & 18 inches deep. This means less area to work on, but it also means we have to be efficient with our space planning. I love the challenge of ensuring a design works as good as it looks, so this is one of the things I'm most eager to get to (& also what is keeping me awake at night). ;)
 |
| Removed all the junk & shelves, patched the holes, and now we are ready to paint! |

Below is my design board. It's a little different from the ones I send to clients; this is more of an inspiration board than a true design board. I'm taking elements from all of the images & giving them my own spin. So, what you see here will not exactly be what you'll see in the end, as opposed to a detailed design that I provide for my clients. But, it will keep me focused on not straying too far outside my ideas, something that can happen when I'm browsing my favorite antiques store, or let's be honest, each time I step inside Target or HomeGoods.
 |
| Clockwise from top left: Melinda Hartwright // Sherwin Williams Urbane Bronze // Schoolhouse Electric Benjamin Moore White Dove // An Urban Cottage // Ladies Home Journal // This Old House // Boston Globe Magazine |
And finally, our to-do list. Phew! Seeing how many things there are still to be done is a little overwhelming. This is definitely going to be a 'take it one step at a time' process.
Laundry:
Install beadboard & molding // Paint & stencil walls // Install hooks on molding // New utility sink //
Entry:
Paint walls // New rug // New lighting
Mudcloset:
Repaint // Lower top hooks so shelf is more accessible // Add shoe storage // Add more hooks
Office nook:
Floating desk //
Chalkboard or pinboard // Lighting
Please check in on our progress again next week! Y'all are keeping me accountable ;)
And remember, there are nearly 200 other bloggers joining in on the fun, so go give them some love!
One Room Challenge Fall 2015
Twice a year, I look forward to reading about those participating in Linda’s (Calling it Home) One Room Challenge (ORC), a blogger challenge to complete one room in your home in 6 short weeks. This year, I have convinced my husband that
we need to participate! It’s not really
the best time for us to dive into a fast-paced, money-draining project, but is
there ever really such a thing as a perfect time?
Our home is a cozy (aka smallish) '70s ranch. We are lucky to be on a full basement, but the main level specifically must be truly functional since it is where we spend most of our time, and there's just no space to waste. Besides, I truly believe in actually living in all of a home's rooms - no "look, but don't touch" spaces for this girl. This does mean we have to get creative sometimes, and our makeover space fits the bill on needing lots of work & out-of-the-box thinking.
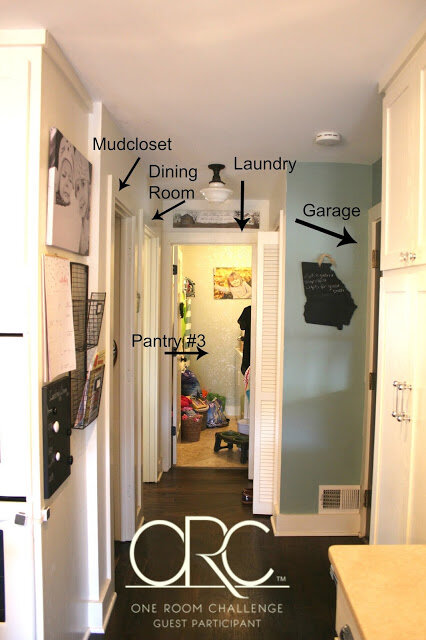
For our first ORC, we will be revamping the hallway/laundry/mudroom/pantry space just inside of our garage door. It’s an awkward layout. Entering from the
garage, you are in a narrow hallway that is part of the kitchen. There are 5 doorways in this tiny space. The laundry room, pantries, “mudcloset”, and
garage door are visible from all parts of the kitchen. The dining room, front
door, & foyer are all visible from the garage door. And the garage door & one of the pantries
are visible from the front door. This
requires a cohesive look that will work with all adjacent spaces, so that your
line of sight is not jarred by incongruent design. It also requires
organization & tidiness, habits on which our entire family are still
perfecting. ;)

Our kitchen is long, narrow, & had 3 pantries when we
moved in, none of which were that close to each other. I realize this may sound wonderful to those
who have no pantry space (it did to me too, before we actually started living
in the space). But it quickly became apparent that we needed a place to hang
our coats & kick off our shoes, not 3 different places to store our
cereal. So, my sweet hubby did a quick
weekend revamp last year, & turned the pantry directly across from the garage door (pantry #2) into a “mudcloset’. Since it is not even
12” deep, I think calling it a mudroom would be a tad overzealous. This area will get a small update.

Our laundry room is at the end of our long kitchen, opposite
the breakfast nook. I am, of course,
constantly in there doing laundry, and the dog’s bowls are in there as well, so
the door is always open. I personally do
not love looking at my piles of dirty laundry while I’m eating, so making this
space more functional, and definitely more appealing to look at, is at the top
of my list. An added bonus is that if I can close the door, the baby will no longer play in the dog's food bowls.
It is a very narrow room, with barely enough space to squeeze in a laundry basket. It's also a catchall for anything that doesn't have a home, so the space gets even narrower with all the junk piled up. Please pretend you aren't appalled by our mess. This is it on a good day. :)

Finally, the space
that I’m most excited about redoing is the 3rd pantry (for those of
you keeping count, pantry #1, a tall set of cabinets close to the kitchen sink, is
staying a pantry). #3 is the biggest
of the pantries, and while we use it everyday for storage, it will be turned
into something we will use even more – an office nook. There is no spot on the main level of our
home for an office. My desk has moved
from the basement (sharing a space in the playroom or my husband’s office
wasn’t practical or feasible) to the family room to the dining room. We had high hopes for a dining
room/library/office combo, but the office part just never felt right. I didn’t love that all of my work stuff,
bills, etc. would be piled high on my desk while we were trying to entertain,
or that my computer screen was the first thing you saw when coming in the front
door as the dining room is directly off the foyer. I will have to keep this small space organized
as it is still partially visible from the front door/dining room, but it’s not
as in your face as when it was in the dining room. And, I have to find a new home for all of the junk we currently have crammed into the pantry. Time to edit!

Overall, I am ecstatic to join in on this fun process –
let’s hope we still think it’s fun in 6 weeks!
Check back every Thursday for updates; next week I'll share my design plan and the start of the deconstruction process. And if you want to be a linking participant like me, check out Linda's blog for details!
Choosing the Best Paint Color for Your Home's Exterior - The Before (Part 1)
When we moved into our home 18 months ago, we created 1, 5, & 10 (or more) year plans for projects around the house. We knew painting the exterior would need to be done within a few years, but this summer we noticed some wood rot & damage that needed to be fixed immediately, so painting jumped to the front of our to-do list. Upon further inspection, we realized the original gutters were rusting through (probably the cause of the damage to the wood), so installing new gutters was added on last minute.
I have always heard that picking exterior paint colors is much harder than interior, and boy, is that ever true. I had three challenges to work with when choosing our new exterior paint colors.
1) Our home is a corner lot, high up on a hill. Within the past year, I read two articles about exteriors that caused me to have a light bulb moment as to why I wasn't thrilled with our current color. First, exteriors need contrast, not just between the house & shutter/door/trim color, but also with your home's surroundings. So, a white home needs lots of trees, bushes, greenery, etc. to provide that needed contrast & pop. Second, a house on top of a hill needs even more contrast with its surroundings, as the distance from the street causes the paint colors to look more washed out than on a home at street level.
What did this mean for us? Well, the right front & rear corner of our home have a lot of trees & shrubbery. However, the left front, side, & rear have none. So, from the street & from our driveway on the left side of the property, there was not enough contrast between the white of our home and the light blue of the sky or the light color of the driveway. Also, our shutters were a light gray & our front door a light green. Close to the house, say from the sidewalk, this all looked very nice. But from street level, I found it to be a little blah. Not to mention that white gets dirty so easily, especially with all of the Georgia red clay found in our yard! So I knew that darker was the way to go. But how dark?

2) Another problem I was facing is our roof color. It is an orangey-brown, a color often found on ranches from the 1970s & '80s. As a new roof (though needed) is not in the budget, I knew that the color I chose would have to work with our existing roof color and with the charcoal roof we hope to replace it with in a few years.
And finally...
3) My style is Southern cottage farmhouse with a bit of coastal thrown in. A white home with black shutters is a classic cottage & farmhouse choice, but as I described in #1 up above, white just wasn't working for me with this home's style & location. The white wasn't a bad choice, and if I had not been able to figure out what I wanted instead, I might have just repainted it the same white color. But I had a hunch that gray, the go-to color for the New England shingled homes that I adore, might work well for us. It would provide the needed contrast, would hide dirt better than white, and would be more "us". But now that I had chosen gray, what gray should I choose?
All paints have undertones. The easiest way to detect the undertone of your paint color is to hold your paint sample against a piece of bright white paper, in the same type of lighting as the area to be painted. At first, I thought that I might like a gray with a little blue in it. But because orange & blue are opposites on the color wheel, the orange tones in the roof strongly brought out the blue in the paint samples. Not what I was going for. I reviewed my list of desires & limitations: gray color for the siding; dark shutters; must work with both orange/brown roof & future charcoal roof. Light bulb moment again! What about a gray with brown or warm undertones and a shutter color with black or brown undertones? I bought my samples of warm grays, and decided a mid-tone would be best. As for the shutters, I needed something that would work with brown (current roof), charcoal (future roof), and warm gray (exterior siding). I also still had to choose the trim, doors, and gutter colors.
I knew I wanted white trim to contrast with the gray siding. My go-to white is Benjamin Moore White Dove, and since it is a warm white, I thought it would probably work with my chosen colors. But after talking to a local paint expert, I learned that white trim is easily washed out in the sun, and so I should choose an off-white or even light gray. She gave me a few recommendations, and one of the light grays was a clear winner.
I went back & forth on colors for the gutters & the doors. Should my gutters be the same as the trim color (light gray) which is more traditional, or the same as the shutters to add a little pop? I drove around my own & nearby neighborhoods, stalking every ranch house's gutters (& looking like a creeper, I'm sure). I finally went with my gut & chose the gutter color closest to my shutters for some added pop.
As for the doors, should I go with red (classic farmhouse style), a light aqua (classic beach/Cape Cod), or the dark color I was using for my shutters? I think they would all look good, but I decided that I wanted the interior of the front door to be the same as the exterior, and I liked how the darker color draws your eye outside when standing in the family room or foyer. We have a 12 pane glass door, and the darker color acts like a frame for the view. It was hard to get rid of our Stratton Blue doors, though. Luckily, my sweet hubby told me that if I change my mind about the door color, he is willing to paint the doors whenever I get a wild hair to do a quick change (which he knows I will definitely do over the course of time)
Final choices revealed in Part 2...
I have always heard that picking exterior paint colors is much harder than interior, and boy, is that ever true. I had three challenges to work with when choosing our new exterior paint colors.
1) Our home is a corner lot, high up on a hill. Within the past year, I read two articles about exteriors that caused me to have a light bulb moment as to why I wasn't thrilled with our current color. First, exteriors need contrast, not just between the house & shutter/door/trim color, but also with your home's surroundings. So, a white home needs lots of trees, bushes, greenery, etc. to provide that needed contrast & pop. Second, a house on top of a hill needs even more contrast with its surroundings, as the distance from the street causes the paint colors to look more washed out than on a home at street level.
What did this mean for us? Well, the right front & rear corner of our home have a lot of trees & shrubbery. However, the left front, side, & rear have none. So, from the street & from our driveway on the left side of the property, there was not enough contrast between the white of our home and the light blue of the sky or the light color of the driveway. Also, our shutters were a light gray & our front door a light green. Close to the house, say from the sidewalk, this all looked very nice. But from street level, I found it to be a little blah. Not to mention that white gets dirty so easily, especially with all of the Georgia red clay found in our yard! So I knew that darker was the way to go. But how dark?
2) Another problem I was facing is our roof color. It is an orangey-brown, a color often found on ranches from the 1970s & '80s. As a new roof (though needed) is not in the budget, I knew that the color I chose would have to work with our existing roof color and with the charcoal roof we hope to replace it with in a few years.
 |
| Sorry for the blurry iphone photo! |
And finally...
3) My style is Southern cottage farmhouse with a bit of coastal thrown in. A white home with black shutters is a classic cottage & farmhouse choice, but as I described in #1 up above, white just wasn't working for me with this home's style & location. The white wasn't a bad choice, and if I had not been able to figure out what I wanted instead, I might have just repainted it the same white color. But I had a hunch that gray, the go-to color for the New England shingled homes that I adore, might work well for us. It would provide the needed contrast, would hide dirt better than white, and would be more "us". But now that I had chosen gray, what gray should I choose?
All paints have undertones. The easiest way to detect the undertone of your paint color is to hold your paint sample against a piece of bright white paper, in the same type of lighting as the area to be painted. At first, I thought that I might like a gray with a little blue in it. But because orange & blue are opposites on the color wheel, the orange tones in the roof strongly brought out the blue in the paint samples. Not what I was going for. I reviewed my list of desires & limitations: gray color for the siding; dark shutters; must work with both orange/brown roof & future charcoal roof. Light bulb moment again! What about a gray with brown or warm undertones and a shutter color with black or brown undertones? I bought my samples of warm grays, and decided a mid-tone would be best. As for the shutters, I needed something that would work with brown (current roof), charcoal (future roof), and warm gray (exterior siding). I also still had to choose the trim, doors, and gutter colors.
 |
| iphone photo again :) |
I knew I wanted white trim to contrast with the gray siding. My go-to white is Benjamin Moore White Dove, and since it is a warm white, I thought it would probably work with my chosen colors. But after talking to a local paint expert, I learned that white trim is easily washed out in the sun, and so I should choose an off-white or even light gray. She gave me a few recommendations, and one of the light grays was a clear winner.
I went back & forth on colors for the gutters & the doors. Should my gutters be the same as the trim color (light gray) which is more traditional, or the same as the shutters to add a little pop? I drove around my own & nearby neighborhoods, stalking every ranch house's gutters (& looking like a creeper, I'm sure). I finally went with my gut & chose the gutter color closest to my shutters for some added pop.
As for the doors, should I go with red (classic farmhouse style), a light aqua (classic beach/Cape Cod), or the dark color I was using for my shutters? I think they would all look good, but I decided that I wanted the interior of the front door to be the same as the exterior, and I liked how the darker color draws your eye outside when standing in the family room or foyer. We have a 12 pane glass door, and the darker color acts like a frame for the view. It was hard to get rid of our Stratton Blue doors, though. Luckily, my sweet hubby told me that if I change my mind about the door color, he is willing to paint the doors whenever I get a wild hair to do a quick change (which he knows I will definitely do over the course of time)
Final choices revealed in Part 2...
Gingham Wall & ScotchBlue Tape
Well, hi! Nothing like months of silence. Our 2nd precious girl arrived at the end of July, and we have been figuring out life as a family of four since. Her nursery is not yet complete, and I'm guessing it will be a good while before it is, but I will share here as soon as it's finished.
We have had lots of other projects in the works, however, and I'm excited to share all the details. One of these projects, redesigning my 4 year old's big girl room, was unplanned, last minute, and not supposed to begin until next year. However, in October, Scotch Blue approached me about a new product and related contest, so we pushed all other projects aside and dove in headfirst!
I was provided with samples of ScotchBlue Painter's Tape with Advanced Edgelock, and encouraged to come up with a creative project to be entered into the Home of ScotchBlue Contest. The winner of the contest will receive $5,000! Anyone is welcome to enter the contest, so get your creative juices flowing! To enter, you must submit a project using ScotchBlue Painter's Tape for under $100. See all the details at ScotchBlue's website, here.
Remember how I mentioned that I did not plan on even touching my oldest daughter's room until well after the New Year? This is because she has very specific ideas for her room, and I knew that recreating the entire room would take time and money, both of which we are short of at the moment. But, when I read that the project had to cost under $100, it got me thinking. What could I do to get the most bang for my buck? She originally told me she would like stripes in her room, but that seemed a little more predictable to me. I like stripes, and, in fact, plan to paint some in my laundry room (in the far future!) but she has a big personality and needs a room to match.
I finally decided to give the wall behind her bed a gingham wall treatment. A touch of preppy for me, a favorite color for her, and a more unusual choice for the sake of design.
It probably took me a little longer than it would have had I been painting a room other than a child's bedroom, but because she couldn't be in there while the paint dried (and it must fully dry between each step), it took me a few days. I would paint in the morning after she woke up, and then have to wait until the next day to move on to the next step. But I think this could be easily done in one full day or perhaps a day and a half.
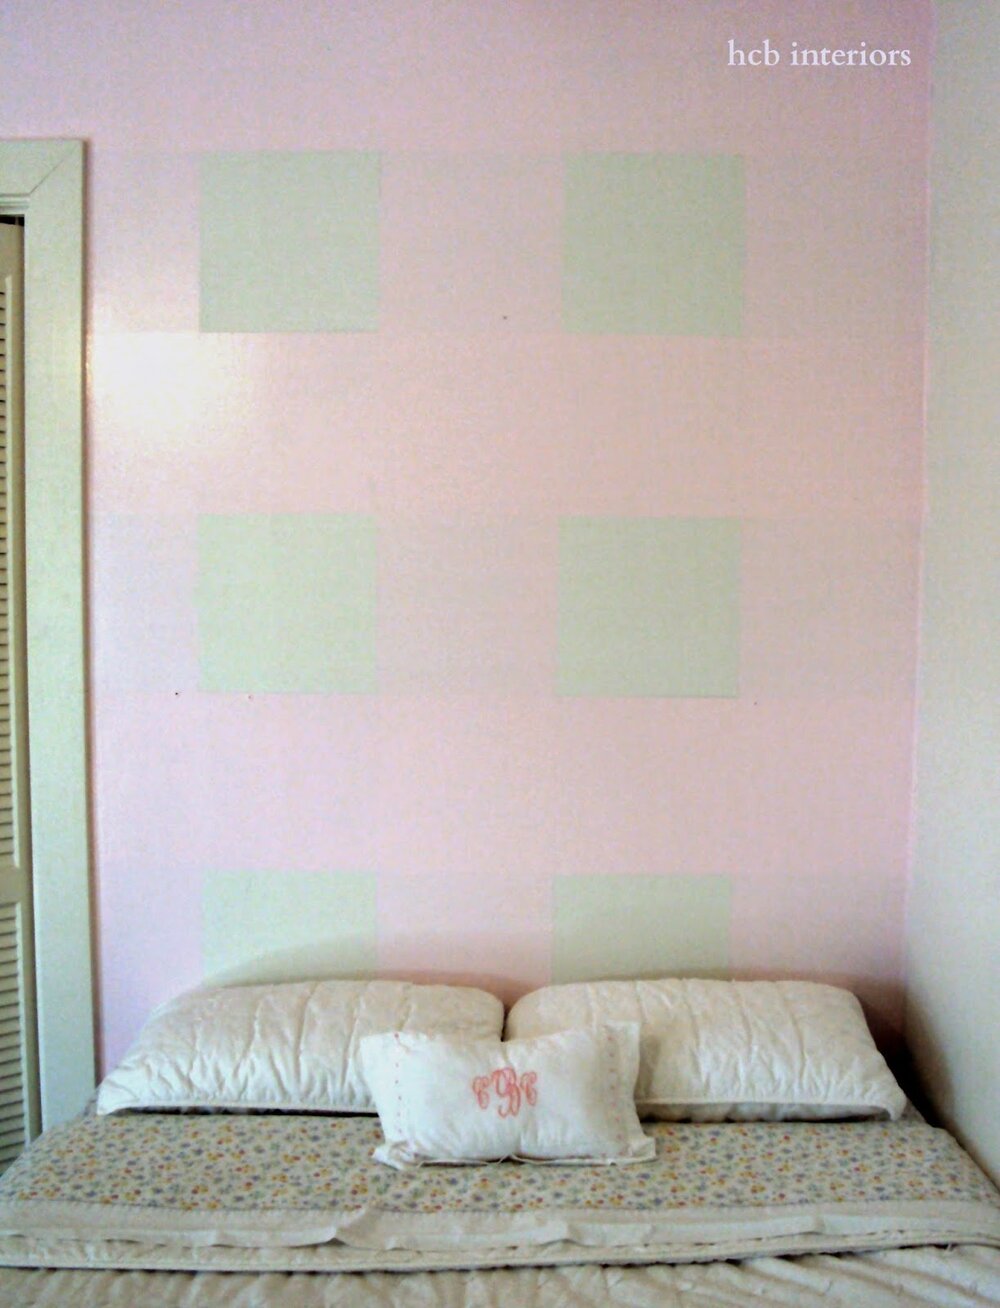
I actually really loved the original paint color, but she has been begging for pink for over a year. And if the fickle 4 year old mind doesn't change after that length of time, I think it's safe to say she will be happy with this change for a long time. Below are the steps for creating a gingham wall in your own home.
Before:

Step 1:
Paint the entire wall white (or whatever you choose for your base color). You don't have to perfectly paint the whole wall (as you can see by my photo), but make sure the parts of the wall where your base coats will show through have a nice, thick coat.

Step 2:
Use a level (mine has a laser on it) to divide the wall into horizontal stripes. These stripes are 12" wide. I measured both the length and height of the wall, and decided 12" would give me a nice size gingham. Just remember that smaller stripes mean more work. ;)
After marking the stripes on the wall, I applied the ScotchBlue Painter's Tape with Advanced Edgelock. I used the one made for delicate surfaces since our drywall is old and tends to tear easily.
I marked with pencil a P for pink in every other stripe, starting at the ceiling, so that I would not get confused as to which stripes to paint and which to leave alone. Also, the stripes you are painting need to cover your marked lines, so the tape will be on the outside edges of the stripes to be painted (pink for me) and the inside edge of the white stripe. Thus, your white stripe will look skinnier, when the tape is up, than your color stripe.

Step 3:
Paint your color stripes, painting OVER the tape. Remove the tape while the paint is still wet to reveal the stripes. I have to admit, I was skeptical that the lines would be perfectly edged. I can't tell you the satisfaction I got from seeing those crisp, straight lines. There was not one speck of paint that had bled through the tape.


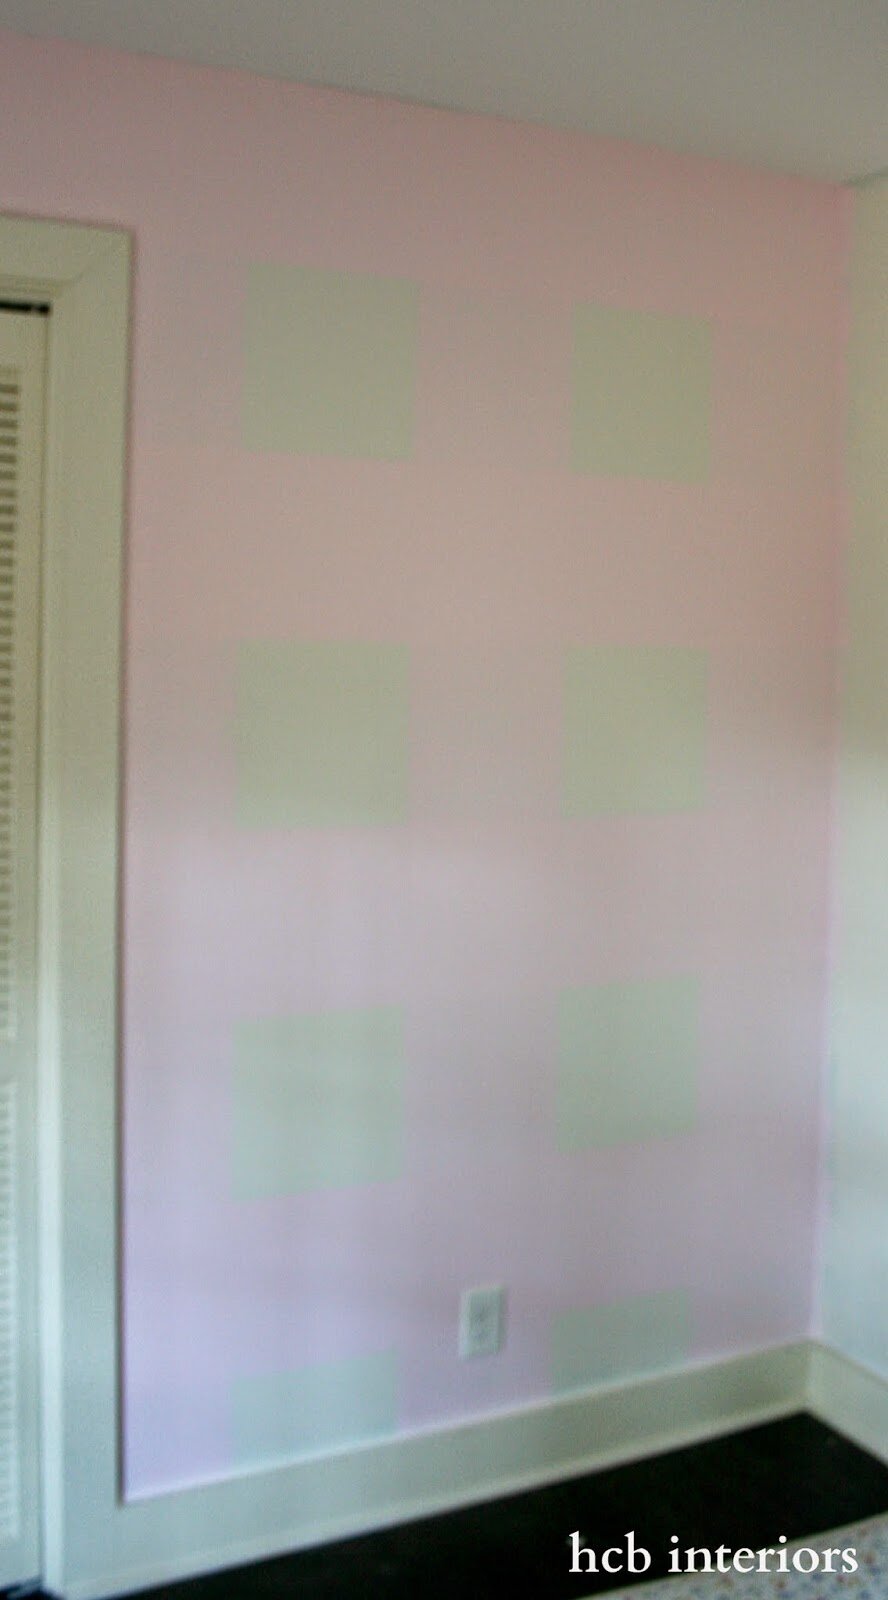

We have had lots of other projects in the works, however, and I'm excited to share all the details. One of these projects, redesigning my 4 year old's big girl room, was unplanned, last minute, and not supposed to begin until next year. However, in October, Scotch Blue approached me about a new product and related contest, so we pushed all other projects aside and dove in headfirst!
I was provided with samples of ScotchBlue Painter's Tape with Advanced Edgelock, and encouraged to come up with a creative project to be entered into the Home of ScotchBlue Contest. The winner of the contest will receive $5,000! Anyone is welcome to enter the contest, so get your creative juices flowing! To enter, you must submit a project using ScotchBlue Painter's Tape for under $100. See all the details at ScotchBlue's website, here.
Remember how I mentioned that I did not plan on even touching my oldest daughter's room until well after the New Year? This is because she has very specific ideas for her room, and I knew that recreating the entire room would take time and money, both of which we are short of at the moment. But, when I read that the project had to cost under $100, it got me thinking. What could I do to get the most bang for my buck? She originally told me she would like stripes in her room, but that seemed a little more predictable to me. I like stripes, and, in fact, plan to paint some in my laundry room (in the far future!) but she has a big personality and needs a room to match.
I finally decided to give the wall behind her bed a gingham wall treatment. A touch of preppy for me, a favorite color for her, and a more unusual choice for the sake of design.
It probably took me a little longer than it would have had I been painting a room other than a child's bedroom, but because she couldn't be in there while the paint dried (and it must fully dry between each step), it took me a few days. I would paint in the morning after she woke up, and then have to wait until the next day to move on to the next step. But I think this could be easily done in one full day or perhaps a day and a half.
Before:
Step 1:
Paint the entire wall white (or whatever you choose for your base color). You don't have to perfectly paint the whole wall (as you can see by my photo), but make sure the parts of the wall where your base coats will show through have a nice, thick coat.
Step 2:
Use a level (mine has a laser on it) to divide the wall into horizontal stripes. These stripes are 12" wide. I measured both the length and height of the wall, and decided 12" would give me a nice size gingham. Just remember that smaller stripes mean more work. ;)
After marking the stripes on the wall, I applied the ScotchBlue Painter's Tape with Advanced Edgelock. I used the one made for delicate surfaces since our drywall is old and tends to tear easily.
I marked with pencil a P for pink in every other stripe, starting at the ceiling, so that I would not get confused as to which stripes to paint and which to leave alone. Also, the stripes you are painting need to cover your marked lines, so the tape will be on the outside edges of the stripes to be painted (pink for me) and the inside edge of the white stripe. Thus, your white stripe will look skinnier, when the tape is up, than your color stripe.
Step 3:
Paint your color stripes, painting OVER the tape. Remove the tape while the paint is still wet to reveal the stripes. I have to admit, I was skeptical that the lines would be perfectly edged. I can't tell you the satisfaction I got from seeing those crisp, straight lines. There was not one speck of paint that had bled through the tape.
Step 4:
When the paint is completely dry, use a level to mark the vertical stripes (also 12"). Then tape along those lines in the same manner as the horizontal, along the outer edge of the stripe to be painted. I should mention that I used a different finish for the white and pink paints; my white was a matte finish and the pink was semi-gloss. I figured the different finishes would help to enhance the gingham effect.
Step 5: Remove the tape while the paint is still wet, and marvel at how easy it was to paint a gingham wall! The ScotchBlue Painter's Tape with Advanced Edgelock completely prevented any paint seepage, so all of my lines were clear and crisp. I have used other painter's tape in various projects, and can attest that not all tapes are created equal. Some leak through, some tear our drywall, etc. This tape removed easily and cleanly, and truly did provide an edge-lock for my stripes. I will be using it from now on in all my projects.
Please excuse the funky shadows in my pictures; the trees directly outside her window prevent a clear shot.
I am excited to enter the Home of ScotchBlue Contest, but more importantly, my daughter loves it. There is still a lot left to do before her room is finished, but I am happy to have this part complete. An added bonus is that the entire project only cost $15, the price of a quart of the pink paint. Had I needed to purchase the ScotchBlue Painter's Tape with Advanced Edgelock, my cost would still be under $25. I already had the white paint, brushes, rollers, etc. for the project, so I definitely feel I met my goal of major bang for minimum bucks. :)
I hope to see some of your own projects on the Home of ScotchBlue Contest website! Good luck!
This is a sponsored post written by me on behalf of ScotchBlue.
Opinions are my own.
Catching Up + A New Design Board
Phew! Has it been as crazy of a spring for y'all as it has for our family? I'm starting to catch my breath but I know it is all about to ramp up again very soon. We have had a busy past few months, mostly because I am expecting our second daughter at the beginning of August! We are overjoyed and oh so grateful for this precious girl coming our way. My body, on the other hand, is not so overjoyed and I have been much sicker this time around. Basic survival has been our mantra lately and the needs of my family have come before the blog. As it should be, right? Suffice it to say, the Lenten cleaning challenge that I wrote about here did not happen. I did manage to organize our linen closet, but that was about all the challenge I could handle. Hoping to try again next year.
In addition to taking care of my fam, I've been working with some great new clients, and I also gave my first public presentation related to design. I was pleased with the topic, and hope that those in the audience were as well. Hope to share more on that soon.
It has been so fun getting to design the nursery for our new little one. Partially because it is the first room in the house that I am designing from scratch. Like most people, we have a small budget for home projects, and so many of the things that I would do to make our house more us will not happen for a long while. Her nursery will be the first room that is completely us from start to finish, and that is exciting (& causing a little anxiety). Designers always have trouble with their own homes because we are exposed to so much every day, and when pregnancy hormones are added into the mix, watch out. :)
But, that's what a good design board is for, right? To act as a visual guide to the room. While changes may be made due to time or money constraints (or because I plain ol' changed my mind), here is the basis of her room. I need to give credit to my awesome, hard-working hubby who said, "no problem!" when I explained I wanted to install some type of board & batten, new lighting, paint, a customized closet system, custom drapery, etc. This will all be DIY so I hope to document some of it here once we finish. Luckily for him, I'm much more relaxed this time around, and keep reminding myself & him that at least she has a crib to sleep in and a glider to be rocked in, if her room isn't finished in time. Much different than the 'it must be done months ahead of time' attitude I had with our firstborn.

After some experimental board placement, we've decided to go with a bit simpler board & batten pattern. Once we layed out some different patterns, the one pictured above was a little too busy for the room (& a lot more work). I am including a picture rail however, & cannot wait to see how that turns out. Above the b&b is Benjamin Moore's Valley Forge Tan. This room was a beast when it came to choosing the paint color. It is a north facing room (so no direct sunlight), tucked into a corner of our house, and every paint color in this room skewed green, peach, or purple. I feel like I am usually fairly adept at seeing the undertones in paint, but this one had me scratching my head. VFT is the closest to what I'm picturing in my head, so I'm hoping it works out.
We already own the crib, glider, side table, lamp, and a similar dresser, so I made sure to work the design around these items in order to save money. The real stars of the room will be the fantastic toile fabric, coral trimmed drapes, and bamboo lantern that reminds me of the one my grandparents had hanging in their breakfast room for years.
I have not yet picked out any art for her room. Art is so personal to me, and while I will choose pieces for clients if they wish, I believe that collecting pieces that speak to you is a much better method than choosing just any old thing at a big box store. It is a surefire way to add depth and character into your home.
Hopefully, I will have an update sooner rather than later. Until then, hoping everyone is enjoying the beginning of summer!
Holly
In addition to taking care of my fam, I've been working with some great new clients, and I also gave my first public presentation related to design. I was pleased with the topic, and hope that those in the audience were as well. Hope to share more on that soon.
It has been so fun getting to design the nursery for our new little one. Partially because it is the first room in the house that I am designing from scratch. Like most people, we have a small budget for home projects, and so many of the things that I would do to make our house more us will not happen for a long while. Her nursery will be the first room that is completely us from start to finish, and that is exciting (& causing a little anxiety). Designers always have trouble with their own homes because we are exposed to so much every day, and when pregnancy hormones are added into the mix, watch out. :)
But, that's what a good design board is for, right? To act as a visual guide to the room. While changes may be made due to time or money constraints (or because I plain ol' changed my mind), here is the basis of her room. I need to give credit to my awesome, hard-working hubby who said, "no problem!" when I explained I wanted to install some type of board & batten, new lighting, paint, a customized closet system, custom drapery, etc. This will all be DIY so I hope to document some of it here once we finish. Luckily for him, I'm much more relaxed this time around, and keep reminding myself & him that at least she has a crib to sleep in and a glider to be rocked in, if her room isn't finished in time. Much different than the 'it must be done months ahead of time' attitude I had with our firstborn.
After some experimental board placement, we've decided to go with a bit simpler board & batten pattern. Once we layed out some different patterns, the one pictured above was a little too busy for the room (& a lot more work). I am including a picture rail however, & cannot wait to see how that turns out. Above the b&b is Benjamin Moore's Valley Forge Tan. This room was a beast when it came to choosing the paint color. It is a north facing room (so no direct sunlight), tucked into a corner of our house, and every paint color in this room skewed green, peach, or purple. I feel like I am usually fairly adept at seeing the undertones in paint, but this one had me scratching my head. VFT is the closest to what I'm picturing in my head, so I'm hoping it works out.
We already own the crib, glider, side table, lamp, and a similar dresser, so I made sure to work the design around these items in order to save money. The real stars of the room will be the fantastic toile fabric, coral trimmed drapes, and bamboo lantern that reminds me of the one my grandparents had hanging in their breakfast room for years.
I have not yet picked out any art for her room. Art is so personal to me, and while I will choose pieces for clients if they wish, I believe that collecting pieces that speak to you is a much better method than choosing just any old thing at a big box store. It is a surefire way to add depth and character into your home.
Hopefully, I will have an update sooner rather than later. Until then, hoping everyone is enjoying the beginning of summer!
Holly
Before & After - Open Floor Plan Kitchen & Family Room
Before, the cabinets were the typical wood found in a lot of new builds around the country. The granite & tile backsplash had been installed by the previous owners, & my clients installed the lighting shortly after moving in (I believe it's from Lowe's).
 |
| Before |
The breakfast area was devoid of character, and presented a drapery challenge since the door & window are so close in proximity.
 |
| Before |
The renovated kitchen sports a new coat of white paint on the cabinets, a new color on the walls, custom drapery on the windows, and a new stainless steel fridge (not pictured). The look is fresh & has a cottage feeling, my clients' preferred style. I always love to see the wonderful effect paint has on a room. The old kitchen really was fine, but this light, airy space is so much more THEM - and that is what matters.
 |
| After |
The breakfast area is another great example of the transforming power of paint. The table is a Wal-Mart (!) clearance find that the homeowner covered with chalk paint. I love that the table & chairs are two different colors; it adds character & a little pizzazz to the space that might not have occurred if they were all painted the same hue.
 |
| After |
The family room and kitchen are separated by a half wall (seen below). Like the kitchen, almost everything was some shade of brown or black. The windows had blinds for privacy but needed some more character.
 |
| Before |
A few simple changes really make a difference. Staying on budget meant working with their current furniture & wall color; she & I have already created design plans for possible changes in the future when time and money allow. Simple Ikea drapes on the windows & some custom pillows for the sofa are currently the only changes to this room, but the whole room seems lighter & brighter.
 |
| After |
Some details that make the space: she added pleats to the Ikea drapes to give the effect of a more custom look. The pillows, all made for the space, are a combination of Ikea's fabulous buffalo check and fabric based on the design board that she was lucky to find at our local discount home fabric store.

The final space currently completed is the powder room. I don't have a before picture, but it was similar to the rest of the house. They added trim around the stock mirror, new paint, and custom drapery.

It has been such a treat to work with these dear clients & friends. Thanks to them for trusting me with their home! I hope it brings you much happiness.
Holly
Restoration (Organizing for Lent)
If you follow me on Pinterest, you probably won't be surprised to hear that I have a bad case of the beach blues. If time & money would permit, I would have left for the beach before the first snow hit Atlanta back in January, & doubt I would return for many weeks.
Besides the obvious (sun, waves, frozen drinks), I've been thinking about what contributes to that sense of calm & soul restoration that comes with a vacation in a beach town. And I realized that all of my favorite places to stay have something in common: a clean, uncluttered atmosphere. Everything is in its place. There isn't a lot of clutter or visual busyness. Towels & beach bags hang on pegs in the halls & baths. Dressers & closets have plenty of space for your stuff. Coffee tables offer a place to rest bare feet or frosty glasses.
Images like the one below spring to mind.
Of course, all of this can also make a vacation home impersonal. Finding a balance between displaying the things that make your house your own vs. not letting your stuff take over is important. I'm inspired to clear out the clutter, to give my spaces room to breathe. My best friend told me about a Lenten challenge to declutter one area of your home every day for 40 days. I believe two blogs, whitehouseblackshutters.com & memoriesoncloverlane.com, are providing instruction on how to accomplish this big task. I'm going to attempt to follow along myself, and will give you an update around Easter. If you decide to join, let me know - I'd love to hear how it went for you!
Besides the obvious (sun, waves, frozen drinks), I've been thinking about what contributes to that sense of calm & soul restoration that comes with a vacation in a beach town. And I realized that all of my favorite places to stay have something in common: a clean, uncluttered atmosphere. Everything is in its place. There isn't a lot of clutter or visual busyness. Towels & beach bags hang on pegs in the halls & baths. Dressers & closets have plenty of space for your stuff. Coffee tables offer a place to rest bare feet or frosty glasses.
Images like the one below spring to mind.
 |
| via |
Of course, all of this can also make a vacation home impersonal. Finding a balance between displaying the things that make your house your own vs. not letting your stuff take over is important. I'm inspired to clear out the clutter, to give my spaces room to breathe. My best friend told me about a Lenten challenge to declutter one area of your home every day for 40 days. I believe two blogs, whitehouseblackshutters.com & memoriesoncloverlane.com, are providing instruction on how to accomplish this big task. I'm going to attempt to follow along myself, and will give you an update around Easter. If you decide to join, let me know - I'd love to hear how it went for you!
My Rock
This post is completely different from my usual decor related writing, but Edie over at Life in Grace is asking for true stories about marriage in celebration of another favorite blogger's new book (The Antelope in the Living Room by Melanie Shankle aka Big Mama). And my sweet hubby deserves some recognition for all he does. He takes his role as husband & daddy so seriously, and because of this, we always feel completely loved & secure. So Matty, this is for you...
We met when I was still a teenager, & got engaged the year I could legally drink. Nursing school & the Army separated us after only 4 months of marriage, and of the next 4 years, only 18 months were spent together. We made sure to spend as much of those 18 months together as possible.
This year we will celebrate our 11th year of marriage; we've been together for 13. During that time, we've felt the effects of war, including a yearlong separation & losing friends before they even reached the quarter mark of life. We've dealt with infertility, only to be blessed with the most beautiful gift God could ever give us. And most recently, & most painfully, we've lived with the incredible grief of losing my mom much too early.
Through all of this, and through all of the wonderful moments too, he has been there. When I feel like the latest obstacle we face just might be too much, he reminds me of his love for me and God's love for us. He is strong for me when I cannot be, & while our daughter, babies, and pride of country can move him to sentimental tears, I've never seen him show weakness.
He wakes every morning with a mission to better himself for his family. He is the fun dad, the handy husband, the friend who will take you to the shooting range one night
only to invite you to Bible study the next. It makes his eternal state of messiness almost forgivable...almost. ;)
We don't usually celebrate Valentine's Day, at least not more than a card or flowers, but I wanted to use this opportunity to say thank you, I love you, I'm grateful for you. And I am better for knowing you & for calling you mine.
Xoxo
We met when I was still a teenager, & got engaged the year I could legally drink. Nursing school & the Army separated us after only 4 months of marriage, and of the next 4 years, only 18 months were spent together. We made sure to spend as much of those 18 months together as possible.
This year we will celebrate our 11th year of marriage; we've been together for 13. During that time, we've felt the effects of war, including a yearlong separation & losing friends before they even reached the quarter mark of life. We've dealt with infertility, only to be blessed with the most beautiful gift God could ever give us. And most recently, & most painfully, we've lived with the incredible grief of losing my mom much too early.
Through all of this, and through all of the wonderful moments too, he has been there. When I feel like the latest obstacle we face just might be too much, he reminds me of his love for me and God's love for us. He is strong for me when I cannot be, & while our daughter, babies, and pride of country can move him to sentimental tears, I've never seen him show weakness.
He wakes every morning with a mission to better himself for his family. He is the fun dad, the handy husband, the friend who will take you to the shooting range one night
only to invite you to Bible study the next. It makes his eternal state of messiness almost forgivable...almost. ;)
Xoxo
 |
| Valentine's Day 2013. He took her on a date before our dinner together :) |
Looking forward, Looking back
Happy 2014! I hope y'all had a wonderful holiday season. We hosted Thanksgiving for the first time in our new home, & then spent December in a whirlwind of parties, celebrations, & just being together. The holidays are bittersweet for us - we have always made a big deal out of Thanksgiving & Christmas in my family, and while we try to continue to celebrate them with joy, it is also the time of year when my mom passed away. Her absence is even more noticeable at Christmas, her favorite time of year. So, I made a conscious decision that if something was too stressful, we just wouldn't do it. It made the season so much more enjoyable, & we spent lots of quality time together, doing our best to honor her memory.
Thought I'd do a quick recap of our year (home/decor wise), & also share some of our plans for 2014. Nothing keeps you accountable like making a public to-do list.
2013 started off with a bang. My business became official, paperwork & all. I began working with some clients who were either referred to me, or whom I met through networking. This was a big change from my previous clients, who were all family & friends. It gave me a sense of validity (although I am super grateful to the family & friends who did use my services - they just might have been a little biased in hiring me). ;)
In late spring, I attended a designers' luncheon & met so many local designers. You can read about that here. I felt like I knew a lot of them already because I have been following their blogs. It was a surreal experience, & I am so grateful for it. It was at that meeting that I met & talked with Julie, which ultimately led to us buying her home. That story can be found here.
The summer was a whirlwind of working with more new clients & doing all the work that comes with buying a home. Thank goodness we plan to be here a very long time; I do not want to go through that again anytime soon! We celebrated our 10th anniversary in mid-August, & then moved 2 days later. It was a hectic week! Since then, we have been slowly moving into the house and have not made many changes yet, as we are trying to take the time to figure out exactly how we want the house to look & work for us. Knowing that we will be here a long time has taken away the sense of urgency to get things done that I have felt in other homes, when I knew the Army would move us again & I had a short amount of time to make a place feel like home.
The fall brought lots of yardwork so that we could host my daughter's birthday party in the backyard. My husband deserves lots of praise for the many nights he spent out in the yard after work, getting everything just right for his baby girl. We also loved celebrating Halloween in our new neighborhood, especially really meeting our neighbors.
We hosted Thanksgiving at our house. The dining room is the only room we have painted so far, & I posted a pic on Instagram (follow me for even more house pics) of the table all ready for the big meal. The color in there before was a beautiful charcoal, almost black color. But we are just not cool enough to have a black dining room, so I went with a blue-gray instead. It was the first time I've had a color custom mixed, & I was pretty pleased with the results. The blue-gray goes much better with my buffalo check drapes, vintage buffet, & library of books. It's much more us.

As I mentioned above, Christmas was both good & difficult. But it was nice to know this was the first of many Christmas mornings to be spent in this house. New Year's Eve day, I hosted some of my mom's closest friends & their kids & grandkids for a little get-together. It was a fun way to close out the year.


I've already begun working with new clients, & am excited to see where my business will go this year. We also have some projects on our to-do list. Below are some of the things we hope to accomplish this year:
*Guest bath: re-paint, hang new hooks so towels are in reach of little hands, & hang new artwork
*Basement: have recessed lighting installed (so it's not a cave down there), organize the storage area
*Pantry: turn this shallow space into a mini-mudroom. We are lucky to have 3 pantry spaces in the kitchen, but no wall space for purses, jackets, backpacks, etc. Hoping it's feasible to turn this tiny space into a mud-closet (room is too generous of a description)
*Whole house: finish unpacking & organizing. We have lots of "storage" going on right now, i.e. stuff is tossed into different empty rooms until we figure out where each item should be stored.
There are a few other projects in the works, and one that has already been completed. Hope to share those soon. Until then, Happy New Year!
Holly
Thought I'd do a quick recap of our year (home/decor wise), & also share some of our plans for 2014. Nothing keeps you accountable like making a public to-do list.
2013 started off with a bang. My business became official, paperwork & all. I began working with some clients who were either referred to me, or whom I met through networking. This was a big change from my previous clients, who were all family & friends. It gave me a sense of validity (although I am super grateful to the family & friends who did use my services - they just might have been a little biased in hiring me). ;)
In late spring, I attended a designers' luncheon & met so many local designers. You can read about that here. I felt like I knew a lot of them already because I have been following their blogs. It was a surreal experience, & I am so grateful for it. It was at that meeting that I met & talked with Julie, which ultimately led to us buying her home. That story can be found here.
The summer was a whirlwind of working with more new clients & doing all the work that comes with buying a home. Thank goodness we plan to be here a very long time; I do not want to go through that again anytime soon! We celebrated our 10th anniversary in mid-August, & then moved 2 days later. It was a hectic week! Since then, we have been slowly moving into the house and have not made many changes yet, as we are trying to take the time to figure out exactly how we want the house to look & work for us. Knowing that we will be here a long time has taken away the sense of urgency to get things done that I have felt in other homes, when I knew the Army would move us again & I had a short amount of time to make a place feel like home.
 |
| Master Bedroom on Move-In Day |
The fall brought lots of yardwork so that we could host my daughter's birthday party in the backyard. My husband deserves lots of praise for the many nights he spent out in the yard after work, getting everything just right for his baby girl. We also loved celebrating Halloween in our new neighborhood, especially really meeting our neighbors.
We hosted Thanksgiving at our house. The dining room is the only room we have painted so far, & I posted a pic on Instagram (follow me for even more house pics) of the table all ready for the big meal. The color in there before was a beautiful charcoal, almost black color. But we are just not cool enough to have a black dining room, so I went with a blue-gray instead. It was the first time I've had a color custom mixed, & I was pretty pleased with the results. The blue-gray goes much better with my buffalo check drapes, vintage buffet, & library of books. It's much more us.
As I mentioned above, Christmas was both good & difficult. But it was nice to know this was the first of many Christmas mornings to be spent in this house. New Year's Eve day, I hosted some of my mom's closest friends & their kids & grandkids for a little get-together. It was a fun way to close out the year.
My beautiful sign from Between You & Me blog. It was the heart of our Christmas decor (excuse the measly garland - I took these pics after I'd removed all the other decorations & forgot about the garland)
I've already begun working with new clients, & am excited to see where my business will go this year. We also have some projects on our to-do list. Below are some of the things we hope to accomplish this year:
*Guest bath: re-paint, hang new hooks so towels are in reach of little hands, & hang new artwork
*Basement: have recessed lighting installed (so it's not a cave down there), organize the storage area
*Pantry: turn this shallow space into a mini-mudroom. We are lucky to have 3 pantry spaces in the kitchen, but no wall space for purses, jackets, backpacks, etc. Hoping it's feasible to turn this tiny space into a mud-closet (room is too generous of a description)
*Whole house: finish unpacking & organizing. We have lots of "storage" going on right now, i.e. stuff is tossed into different empty rooms until we figure out where each item should be stored.
There are a few other projects in the works, and one that has already been completed. Hope to share those soon. Until then, Happy New Year!
Holly